In this article, I’ll show you how to connect an infrared receiver to your Raspberry Pi and use the evdev interface to read and interpret the signals sent by most common household remote controls using Python.
Infrared provides a simple, typically one-way communication channel that can be used to communicate with a range of devices, from TVs and air conditioners to wireless speakers and even supermarket shelf labels.
Prior to the “Buster” release of Raspbian, a third-party package such as LIRC was needed to receive and interpret IR signals. Since Linux kernel 4.18, support for infrared receivers has been built into the evdev driver, which makes interfacing a receiver significantly easier by providing a simple input driver through which events can be read.

I don’t think I even own the devices half of these are for anymore
Using only a single component, we can enable infrared reception of most consumer remote controls by the Raspberry Pi, allowing us to repurpose these remotes to perform pretty much any function your device can execute.
Bill of materials
Everything you’ll need to get the job done:
- A Raspberry Pi (any model)
- SD card with Raspbian / Raspberry Pi OS “Buster” or newer
- An infrared receiver module (widely available from electronic stores)
- An infrared remote control
Connecting the sensor
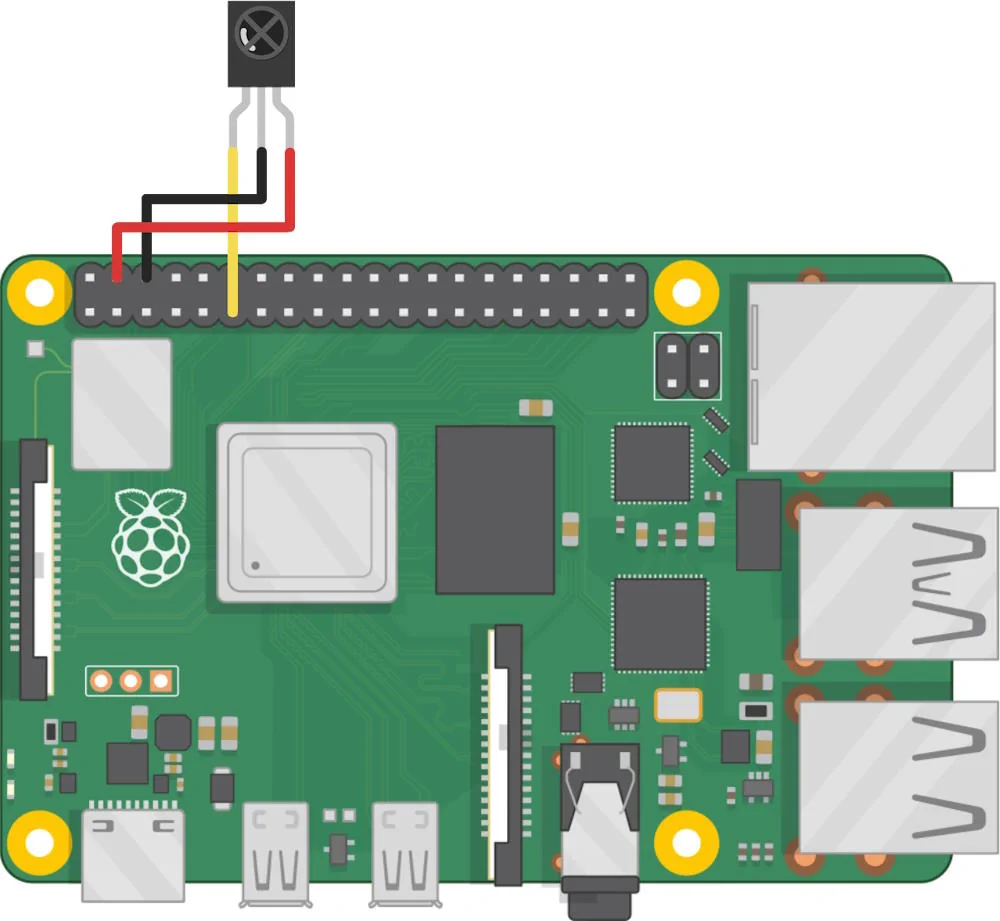
About as simple as they come – just connect the sensor as shown. When viewing the sensor facing you, the pins from left to right are (usually) DATA, GND and VCC (but check your datasheet just in case!)
In this example, we’ll be using GPIO17 (pin 11).

Enabling IR communication on the Raspberry Pi
Before we start, as always it’s best to update everything using sudo apt-get update && sudo apt-get upgrade.
There are four main tasks we need to achieve:
- 1: Enable Device Tree overlays (dtoverlay) to enable the kernel to talk to the IR receiver:
Edit the Raspberry Pi config file:
sudo nano /boot/config.txt
Uncomment this to enable infrared communication. Change the pin to suit your configuration if required.
dtoverlay=gpio-ir,gpio_pin=17
Reboot when finished:
sudo reboot
- 2: Install ir-keytable to receive IR scancodes via the sensor:
Install the ir-keytable package and temporarily enable all protocols:
sudo apt-get install ir-keytable
sudo ir-keytable -p all
Note that the last command will not persist a reboot and is for testing only (we’ll take care of this later!)
- 3: Install evdev, providing a Python interface to read input events generated when IR signals are received:
You may need to install pip for Python 3 if not already present:
sudo apt-get install python3-pip
Install the evdev library and evtest package
sudo pip3 install evdev
sudo apt-get install evtest
Run evtest to try it all out:
sudo evtest
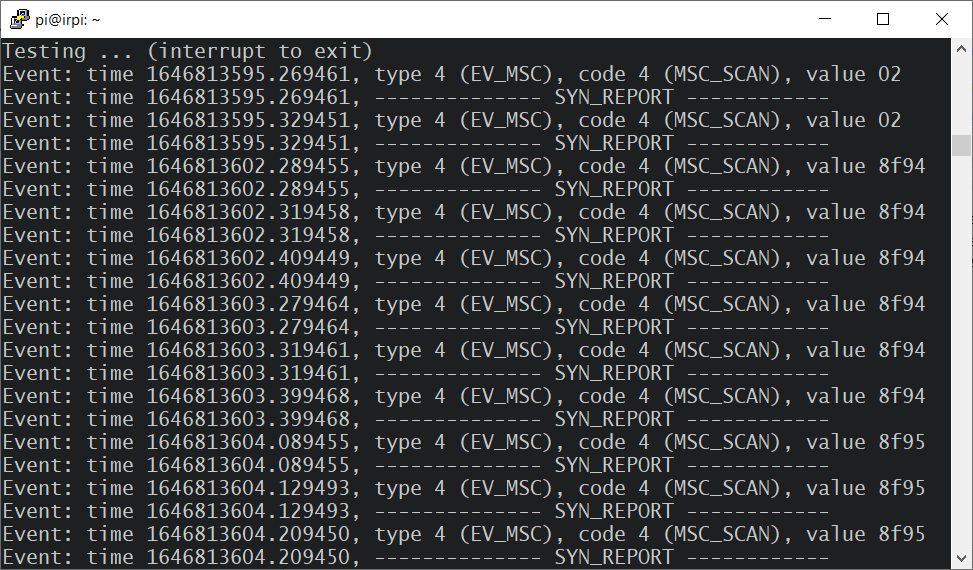
At this point, you can grab a remote and start pressing buttons. If everything works, you should see the raw events that we can read using evdev:

This confirms that we can read these received scancodes using evdev!
- 4: Make the changes persistent so that all scancodes can be read following a reboot.
Edit the rc.local file to enable all protocols at boot:
sudo nano /etc/rc.local
Update the file to include the following line, at the bottom just above exit 0:
ir-keytable -p all
The above takes a bit of a shortcut by enabling all protocols; the result of which is that we’ll receive scancodes from any supported remote, which should suit most applications. If you’d like to capture only one specific remote type, you could create custom keymap.
Interfacing with Python
Once all the above is set up, reading received scancodes is in Python is straightforward; I’ve written some basic code that should cover most use cases.
First, we need to import the evdev package:
import evdev
Then, detect which device is our IR receiver:
def get_ir_device():
    devices = [evdev.InputDevice(path) for path in evdev.list_devices()]
    for device in devices:
        if (device.name == "gpio_ir_recv"):
            print("Using device", device.path, "n")
            return device
    print("No device found!")

dev = get_ir_device()
Finally, we can read a list of scancodes since last read (or script started):
sleep(5)  # allow some time to press buttons on remote
events = dev.read()

try:
    event_list = [event.value for event in events]
    print("Received commands:", event_list)
except BlockingIOError:
    print("No commands received.n")
Note that if no events are present, a BlockingIOError exception will be raised which must be caught as shown.
Alternatively, we can block until a command is received:
while(True):
    event = dev.read_one()
    if (event):
        print("Received commands", event.value)
        break
I tie this all together in a single demo with detailed comments, which you can find in my github repository. Detailed documentation on reading events with evdev can be found here.
That’s a wrap – using the supplied examples, you should be able to seamlessly integrate infrared based controls into your Raspberry Pi Python projects.